Safe dog muzzle introduction steps: a simple, kind plan

The safest way to introduce a muzzle is a staged, positive-reinforcement plan built on short sessions lasting just a minute or two and a correctly fitted basket-style muzzle. Nothing about it needs to feel scary for your dog, and it doesn’t need to take long to see progress.
Here’s your starting checklist:
Choose a basket muzzle that lets your dog pant, drink and take treats.
Let your dog sniff it freely, rewarding every glance or nose-touch.
Feed treats through the front so the nose goes in voluntarily.
Add the strap loosely, then build up wearing time in tiny steps.
Always remove it yourself, calmly, before your dog asks you to.
Pro Tip: Keep a running mental note of panting, drinking and comfort at every stage. If any of those three stop happening freely, you’ve moved too fast.
Key Takeaways
Safe muzzle acceptance comes from short, choice-based training sessions paired with a correctly fitted basket muzzle that always allows panting, drinking and treats.
Point | Details |
Keep sessions short | Run one to two minute sessions, several times a day, to hold your dog’s interest. |
Fit the strap properly | Leave room for 1–2 fingers underneath the strap so it’s secure without chafing. |
Never force the muzzle | Let your dog choose to place their own nose in for a treat at every early stage. |
Watch for stress signs | Lip-licking, freezing or turning away means pause and return to the previous stage. |
Get expert support when needed | Happy-dogtraining offers assessments, guided fittings and coached sessions for dogs with bite history or fear. |
Table of Contents
Why teach safe dog muzzle introduction steps at all?
A muzzle isn’t a punishment tool. It’s protective equipment, and most dogs will need one at some point, whether that’s a routine vet exam, a grooming session, a trip to a crowded event, or an unexpected injury where pain makes even the gentlest dog snap.
Common situations where a muzzle earns its keep:
Veterinary exams, especially anything involving pain or restraint
Nail trims and grooming for dogs who find handling stressful
Preventing scavenging or ingestion of something dangerous on a walk
Emergency situations where a frightened or injured dog may bite
Legal requirements for certain breeds or locations
A muzzle protects your dog, the professionals handling them, and the public around you. It also prevents the kind of forced physical restraint that can deepen fear-based aggression rather than resolve it.
Pro Tip: Think of muzzle training like insurance. You hope you never need it urgently, but the emotional cost of a first-ever introduction happening mid-crisis is far higher than a few calm weeks of practice now.
Which type of muzzle should you choose, and how do you size it?
Two main styles cover almost every situation: basket muzzles and soft (mesh) muzzles. A basket muzzle is the safer default because it lets your dog pant, drink and take treats even during longer periods of wear. A soft muzzle clamps the jaws shut, which works fine for a two-minute nail trim but becomes risky if it’s left on any longer, particularly in warmth or during exercise, according to Best Friends Animal Society.
Getting the size right matters as much as picking the style. Measure your dog’s snout length (tip of nose to just below the eyes) and girth (widest point, usually just in front of the eyes) to compare against manufacturer size charts.
What to check | What good fit looks like |
Panting | Mouth opens freely inside the basket |
Drinking | Dog can lap water without removing the muzzle |
Treats | Small treats or paste fit through the front gaps |
Strap tension | 1–2 fingers fit comfortably underneath |
The strap detail is the one owners get wrong most often. Cornell University’s veterinary guidance is specific: it should sit snug enough not to slip off, but loose enough that one or two fingers slide underneath without a squeeze.
What are the step-by-step muzzle introduction stages?
This is where most of the real work happens, and it rewards patience over speed. Every stage below should feel almost boring in how gentle it is. If your dog seems worried at any point, you’ve skipped ahead too fast, and the fix is simply to go back a stage, not to push through.
Stage 1: Neutral exposure and sniffing. Place the muzzle on the floor, unfastened, and let your dog approach it in their own time. Scatter a few high-value treats near it, then closer to the opening, then just inside the rim. Keep this stage to sessions of one to two minutes, once or twice a day. VCA Animal Hospitals recommends this short window specifically because longer sessions tend to lose the dog’s interest or build frustration rather than confidence.
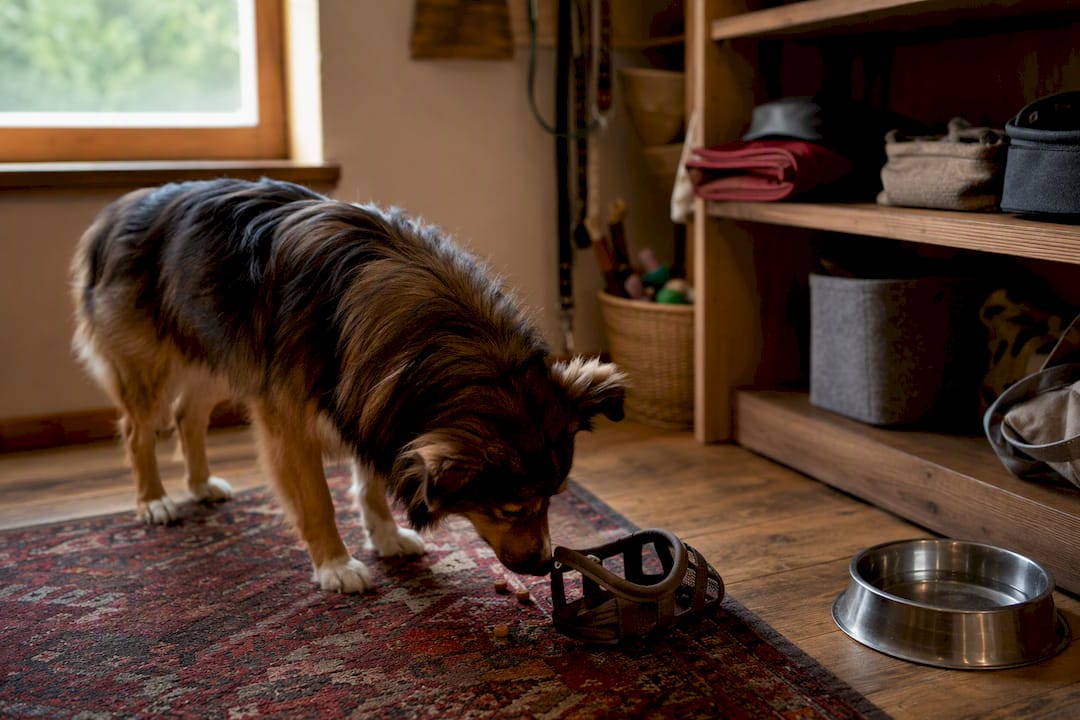
Stage 2: Voluntary nose-in. Hold the muzzle steady and let your dog push their own nose in to reach a treat, rather than moving the muzzle towards them. This distinction matters: a dog who chooses to put their nose in learns something completely different from a dog whose face is pushed into a piece of equipment. Fear Free Happy Homes suggests smearing a lickable paste on the inner rim to extend the time your dog’s nose stays inside, which naturally builds duration without any pressure at all.
Stage 3: Brief slip-on with immediate removal. Once your dog is happily pushing their nose in for the paste, slip the muzzle on and off within a second or two, rewarding heavily each time. Gradually stretch this to a few seconds, then introduce the strap. Let the strap hang loose at first, just touching the fur, before you ever do up the buckle. Dogs Trust is firm on one point here: your dog should always have the choice to pull away during this stage, and that choice is what builds trust faster than any amount of repetition.
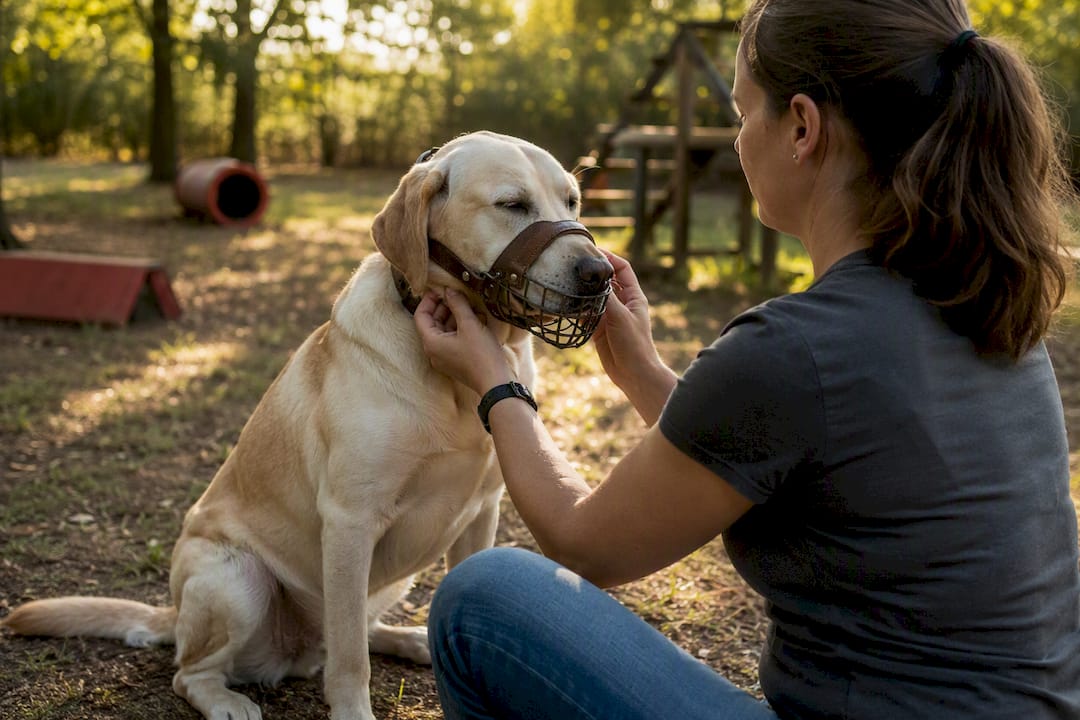
Stage 4: Add movement and light fastening. Once your dog tolerates the strap being fastened loosely for a few seconds, start adding tiny bits of movement, a step or two around the room, a sit, a hand target, all while muzzled and rewarded generously. From here, duration increases become the main variable you’re adjusting.
Some dogs move through all four stages within a week. Others, particularly those with prior negative handling experiences, need several weeks, and the AKC’s own guidance is clear that the pace should be set by the dog’s comfort level, not a calendar.
Pro Tip: Switch your reward as duration increases. Small dry treats work well for the first quick nose-ins, but a lickable paste smeared inside the basket keeps your dog occupied and calm during the longer strap-fastened stages, when you need several seconds of stillness rather than one quick bite.
How do you put the muzzle on correctly each time?
Once your dog accepts the muzzle in training sessions, the daily routine of putting it on should follow the same gentle sequence every time.
Hold the basket steady in one hand, supported from underneath.
Present a treat through the front opening and let your dog choose to lean in.
Slip the muzzle over the nose only once your dog’s nose is already inside for the treat.
Fasten the strap loosely first, checking for the 1–2 finger gap, then reward immediately.
Always remove the muzzle yourself while your dog is still calm, never waiting until they show signs of wanting it off.
A correct fit looks even and level from the front, with no pinching at the corners of the mouth, and the strap sitting flat rather than twisted behind the ears.
Pro Tip: Removing the muzzle before your dog asks for it prevents them learning that pawing or headshaking is what makes it disappear. That single habit does more for long-term ease than almost anything else in this plan.
How long can a muzzle safely stay on?
There’s no fixed, universal time limit for muzzle wear, and anyone who gives you an exact number in minutes is oversimplifying. What matters far more is supervision. Four Paws frames it plainly: muzzles are temporary, supervised tools, and any extended wear must still allow full panting and drinking.
Watch your dog’s breathing closely; laboured panting or distress means it comes off now.
On hot days or after exercise, muzzle time should be shorter, not longer.
If travel requires extended wear, choose a muzzle designed to allow water access.
Never leave a muzzled dog unsupervised, even for a few minutes.
Never use a muzzle as a way to punish barking, chewing or unwanted behaviour.
Muzzles restrain the mouth, not distress. Using one as discipline teaches fear, not calm.
What if your dog resists, freezes or paws at the muzzle?
Resistance is information, not failure. Watch for turning the head away, lip-licking, freezing completely still, or backing off from the muzzle entirely; these are all signs your dog has moved past their comfort threshold.
Sign you’ll notice | What it means | What to do next |
Turning head away | Mild discomfort | Pause, offer treat further from muzzle |
Lip-licking, yawning | Rising stress | Shorten the session, end on success |
Freezing in place | High stress | Stop, return to sniffing stage |
Backing away entirely | Overwhelmed | Remove muzzle, restart tomorrow |
When any of these show up, drop back to the last stage where your dog was relaxed and rebuild from there with smaller steps and more frequent rewards. Never force the muzzle over the nose, rush the strap, or punish a dog for trying to pull away. Doing so undoes weeks of careful work in a single session.
When should you call in a professional trainer?
Some situations are better handled with expert support from the start rather than trial and error at home.
A history of biting, especially around the face or muzzle area.
Intense fear reactions to handling, restraint or unfamiliar objects generally.
Sensitivity around the head, ears or mouth that predates the muzzle work.
No visible progress after several weeks of patient, staged practice.
A qualified trainer or behaviourist will assess bite risk, build a tailored desensitisation plan, and often handle the first few fittings in person to keep both you and your dog safe. Look for an AVS-accredited trainer or a board-certified behaviourist, particularly for dogs with any bite history.
Why early, positive muzzle training matters
Teaching muzzle acceptance while your dog is calm, rather than waiting for an emergency, is one of the clearest markers of humane, thoughtful ownership. It protects your dog from the fear that comes with forced restraint, and it protects everyone who might need to handle them one day, vets, groomers, even strangers in an accident. This isn’t preparation for the worst. It’s simply care, delivered early enough to matter.
If you’d rather have hands-on help: professional muzzle-introduction sessions
Happy-dogtraining gives you what a set of online instructions can’t: a trained pair of eyes watching your dog’s actual stress signals in real time, adjusting the pace on the spot instead of leaving you to guess from a screen. If your dog has any handling sensitivity or bite history, that in-person read matters more than any written stage guide.
A typical muzzle-introduction session includes a short behavioural assessment, guided fitting to find the right basket size and strap tension, one to two coached training sessions working through the desensitisation stages, and follow-up support once you’re practising at home. Sessions are run by an AVS-accredited trainer with experience across fearfulness, aggression and general obedience work, so the plan gets tailored to your dog rather than applied as a template.
If your dog shows strong avoidance or a bite history, start with an aggressive behaviour consult rather than attempting the full programme solo. For general muzzle coaching alongside broader obedience goals, take a look at Happy-dogtraining’s training programmes and book a session that fits your dog’s needs.
Sources
Recommended
Comments